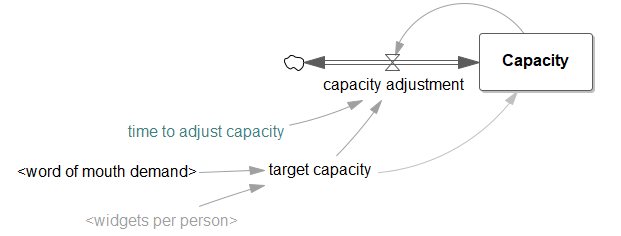
Now we would like to expand our model by considering production capacity issues. Customer demand might outstrip our capacity to supply the product. Therefore, we will build a production capacity view that is linked to the customer view and limits the customer demand if capacity is reached.
| Ø | Select the menu item View>New. Or the + button on the bottom toolbar. |
Let us give this view a name so we can easily navigate between different views.
| Ø | Select the menu item View>Rename. Type in the name Capacity and click OK. |
| Ø | Select the Level tool and click on the sketch. Type the name Capacity and press Enter. |
| Ø | Select the Rate tool, then click on the sketch to the left of Capacity then click on Capacity. Type the name capacity adjustment and press Enter. |
| Ø | Using the Move/Size tool, click with the right mouse button on the handle (the little circle) in the middle of the left hand Rate pipe. The Arrow Options dialog will open. Check the box for Arrowhead at the top of the dialog then click OK. |
This extra arrowhead indicates that this Rate pipe can flow in either direction. Or in other words, the Rate can increase or decrease the Level Capacity. Note that actual behavior of the Rate is governed by the equation, not by the arrowhead that we just added.
| Ø | Create the other variables and connect them with arrows as shown below: |
