To help a newcomer to the model, it is appropriate to set up some instructions and guides to help them navigate around.
| Ø | Create a new View by selecting **New** on the Status Bar View button. |
Renaming Views
| Ø | Select menu View>Rename. In the dialog that opens type in "Overview" and click on OK. |
Your view will now be called "Overview." You should rename the other views in the same manner to "Structure," "Simulate," and "Game."
Reordering Views
| Ø | Select menu View>Reorder. |
| Ø | Press the mouse button on "Overview" in the list of Views. |
| Ø | Holding down the mouse button move the mouse up to near the top. |
"Overview" should disappear and the shape of the pointer should change to a crosshair.
| Ø | Move the crosshair up so that it is centered near the top of the first name (Structure) and let go of the mouse button. |
"Overview" should appear in the first position. If it does not just repeat the operation letting go of the mouse a little lower. If you move the center of the crosshair outside of the list "Overview" will just drop back to its old position.
| Ø | Click OK. |
Adding Commentary
If you are not currently on the "Overview" View, move there by selecting "Overview" from the bottom View button or by using the Page Up and Page Down keys.
| Ø | Select the Comment tool  and click on the top part of the screen. and click on the top part of the screen. |
| Ø | Type in some commentary you think will be helpful. See below to see what comments we added. |
Navigation Links
A Navigation Link is just a comment with the Navigate field filled in. When you click on a Navigation link (with the Lock tool selected) the View is automatically changed to the View named in the Navigate field.
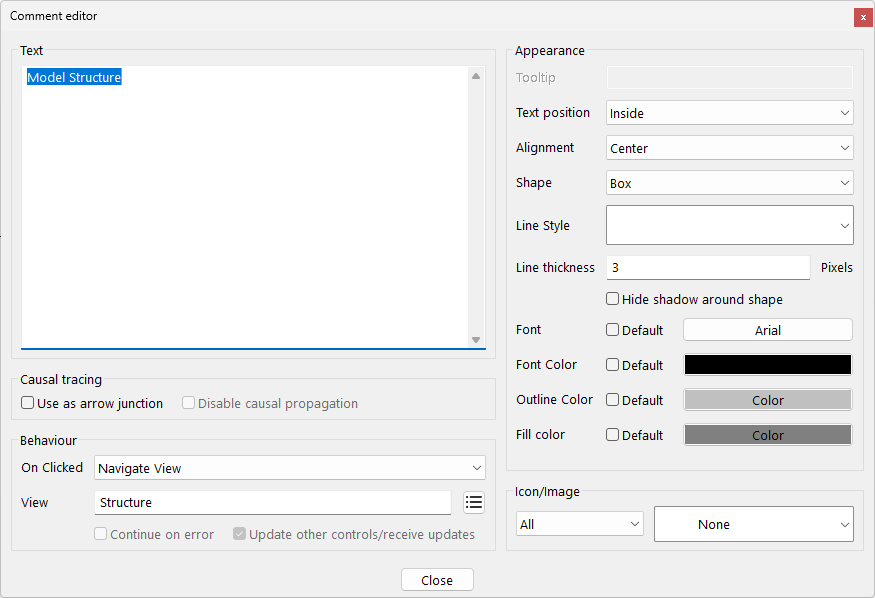
| Ø | With the Comment tool, click on the diagram below your existing comments. |
| Ø | Type in "Model Structure" and select Box in the Shape field. |
| Ø | Click on the ... button to the right of Navigate View. |
A list of views will appear in a new dialog.
| Ø | Select "Structure" from the list and click on OK. |
| Ø | Click on the button to the right of Shape Color and click on a dark gray button. |
| Ø | Click on the button to the right of Background Color and click on a light gray color. |
| Ø | Fill in the field Thickness below the colors with two. |
The use of a gray color and dark gray box with Thickness set to 2 makes the Comment look a little more like a button.
The comment description dialog should appear as:
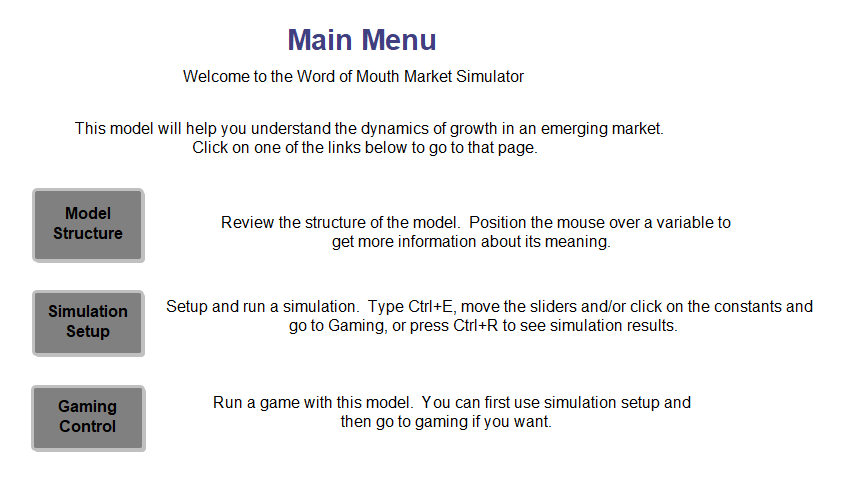
| Ø | Set up Navigation Links to each of the other views giving them the labels "Simulation Setup" and "Gaming Control." |
You should have a diagram that looks like this:
| Ø | Add in Navigation links back to the Overview View from each of the other Views. In the Simulation View you also need to add a Navigation link to the Game View. |
Now is a good time to save your model. The changes that have been made here are also saved in the model wom4.vmf contained in the directory UserGuide\chap12\Complete if you want to compare them with your own changes. The .vmf file extension used instead of the normal .mdl extension and this is discussed below.