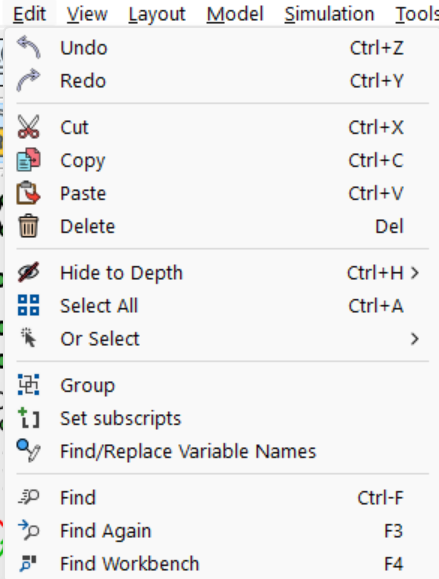
The Edit menu allows you to manage cutting, pasting and selection. Depending on the state of activities, many entries in this menu will be grayed. Undo is only active if you have made a change and Redo is only active is you have used Undo. Copy, Cut, Hide to Depth and Set Subscripts† are only active if you have made a selection using the pointing tool. Paste is only active if you have Copied or Cut something from another View.
Undo/Redo
The Undo and Redo commands allow you to Undo changes you have recently made. Vensim keeps a running log of changes you have recently made and the labels on these menu items will reflect the changes that can be undone or redone. For simple changes like moving variables Vensim will grow the Undo buffer to an unlimited depth. For other changes involving model structure such as Grouping, Setting Subscripts, Editing Equations and Merging Variables Vensim will only allow you to undo a single change. You can use Ctrl+Z as a shortcut for Undo, and Ctrl+Y for Redo.
Copy
Copy copies the currently selected words (and structure) into the clipboard. The full sketch information (positioning, arrows, etc.) is stored privately by Vensim for use with the Paste command. The appearance of the sketch is also sent to the clipboard as a Windows Metafile, clipped to the selection rectangle. You can paste this Metafile into most other applications (word processors, etc.). The Options Settings for Export as Printed and Export in Color are used in creating this Metafile.
Cut
Cut copies the selected words to the clipboard and also removes them. When you use this command you will be queried as to what you want to do:
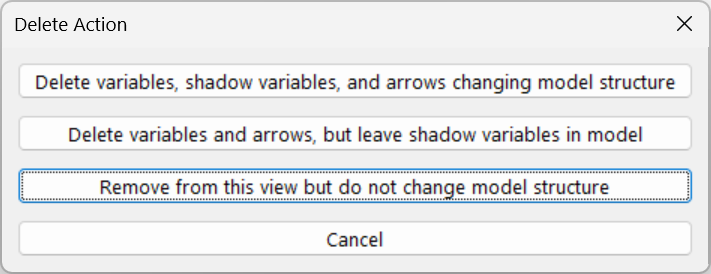
The default action is to Remove from this view but do not change model structure. The selected words will be removed. Any arrows connecting two selected words will also be removed. A selected arrows connected to a word that is not selected will be hidden. If a word has an arrow leaving it and going into a word that is to be retained, the word is made a shadow variable and hidden from the view, but not deleted. This option is not available for Vensim PLE or PLE Plus.
Delete variables, shadow variables and arrows changing model structure deletes each of the selected words from the model. For variables and shadow the variable, its equations, comment and units of measure will be deleted from the model and all views.
Delete variables and arrows but leave shadow variables in model will delete all selected normal variables and all selected arrows from the model. Shadow variables will not be deleted from the model, but only removed from the view or. Note that a shadow variable that is also selected as a variable will be deleted. Also, if a shadow variable is used in the view it will just be hidden, not removed from the view.
If you cancel out of this dialog no action is taken and nothing is copied to the clipboard.
NOTE Pressing the Del key is the same as Cut except that nothing will be placed in the clipboard.
Hide to Depth (Not PLE)
Hide to Depth allows you to set a hiding depth for the selected words and arrows. There are 10 levels of hiding: Unhidden, followed by 1 through 9. Choose one of these from the menu that appears when you highlight Hide to Depth. You can use the View menu to choose to which depth you want hidden elements to be visible. For example is you hide to Depth 5 and then View Depth 5 you will see the elements.
Hiding elements to different depths allows you to unfold model structure by successively showing more hidden elements. The Magic Wand tool can also be used to control hiding. The Magic Wand hides elements to one depth greater than the current depth shown.
Paste
Paste causes the selection that was last cut or copied to be placed into the current view, and can also be used to place graphics copied from other applications into the current view. In Vensim PLE and PLE Plus, past will replicate the structure and add it to the model as described below (with no prefix or suffix specified). In other configurations when you execute the Paste command, you will be prompted to determine how you want to paste the clipboard information.
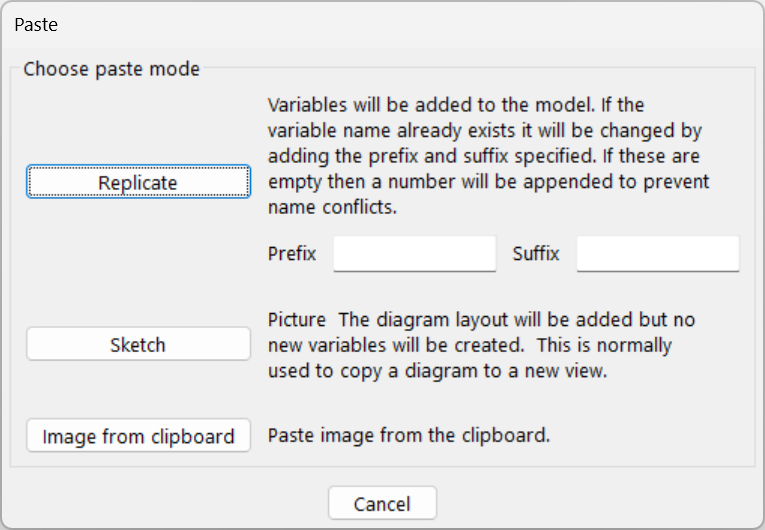
Replicate makes an additional copy of the model structure you have copied, creating new variables and equations in the model.
For each variable that is defined in the structure you have copied, Vensim will add the prefix and suffix specified then check to see if the variable is defined in the current model. If it is, Vensim adds a zero (0) at the end of the variable name (Population becomes Population 0). If the variable with the 0 appended is also in the current model, Vensim adds a 1 (Population 1). If this variable is also defined Vensim adds a 2,3 ... 9, A, B, ... Z until it finds a variable that is not yet defined, then uses this name.
You can leave both the prefix and suffix blank to get just the numbering as described above. Typically, you would only use one or the other and you might want to end the suffix with a space or begin the prefix with a space. For example if you were making a copy of a population structure for different species you might use "Rabbit " as a prefix, then Population would become Rabbit Population.
For each shadow variable that is in (but not defined in) the structure you have copied, Replicate checks to see if that variable is in the current model. If the variable exists in the current model, Vensim uses the existing variable. If not, Vensim adds the variable to the model, gives it an empty equation, and brings it into the view as a shadow variable without making any changes to its names..
For Lookups and Subscripts used in the source equations, Vensim checks to see if they are defined in the target model. If so, the existing Lookup or Subscript is used. If not, the Lookup or Subscript is copied from the originating model and no change is made to the variable name.
For each variable defined in the structure you have copied, Replicate replaces its equation with one that uses the renamed variables.
These rules provide a simple mechanism for joining models together and repeating pieces of structure. They do present a potential problem, however, in that a variable name intended to represent one concept can replace a variable name intended to represent another concept when a structure is replicated between models. Care should be taken in naming variables to guard against this possibility.
Picture works only at the visual level, and will not alter the structure of the model. It is useful for repeating a visual representation of a structure in different views, or between distinct but similar models. Vensim expects the variable names contained in the picture to also be in the current model, and will not allow you to enter a second definition for a variable. If any problems are detected, you will be asked if you want to continue.
If you do a Select All followed by a Copy, then create a new view (View>New) and do a Paste selecting Picture, you will have a copy of a view that you can further modify. This is useful for building two visual representations based on a common foundation.
Annotation is used to place a graphic copied from another application onto a sketch. It is the same as using the Sketch Comment tool and selecting the Metafile or Bitmap options.
Select All
Select All selects all sketch objects in the view you are working with. This is useful for copying and for making global modifications to word and arrow characteristics. The command View>Font is preferred for making global font changes.
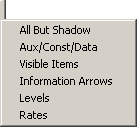
Or Select
All but Shadow allows you to select all variables except those that appear as shadow variables. This is quite useful for applying groups and simulating subsets of the model as described below.
Aux/Const/Data allows you to select everything except rates and levels. This is useful if you want to apply separate attributes to these variables.
Visible Items selects everything you can see. It is the same as using the Pointer tool and dragging over the whole sketch, starting in the upper left hand corner and finishing in the lower right.
Information Arrows selects all the information arrows but not the rates. This is useful for changing attributes. Note that perpendicular information arrows will not be selected.
Levels selects all Levels in the view.
Rates selects all the rates in the view as well as the associated valves and pipes. Note that perpendicular information arrows will also be selected.
Group
Group places all the selected variables into a group. This is useful for documenting the model and managing equation order when the model is reformatted. When you select this command you will be queried for the name of a group. You can select an existing group, or enter a new group name. All selected variables will then be made part of that group. The Document tool has an option to document all members of a group.
Set Subscripts†
The Set Subscripts command lets you set subscripts on the selected variables. This is a convenient way to add subscripts to the model variables without having to modify individual equations. It is, of course, still possible to modify individual equations and this is often necessary when you have multiple equations for a variable or want to use a vector function.
When you choose the Set Subscripts command the Subscript Modification dialog will appear:
The title bar indicates that name of the variable being changed or, if you have selected more than one variable, the number of variables being changed.
Subscript 1 through Subscript 8 allow you to set the subscripts. Normally you will only use one or to of these but it is possible to use all 8 so they are included for completeness. Click on the dropdown box to select a Subscript Range. When you open this dialog with a single variable selected the subscripts showing will be those for the variable. If you open it with more than one variable selected and each selected variable has the same subscripts (in the same order) these will be shown. If the subscripts are not the same for the existing variables the dialog will appear as it does above, with --none showing for each subscript.
Apply to selected variables by lets you specify how you want to modify the equations for the selected variables.
Setting causes the selected variables to take on the new set of subscripts. The subscripts for these variables are changed to be the ones specified in the order specified. If a variable already has any of these subscripts the usage will not be changed. For example if Pop was subscripted by age and there was an equation with SUM(Pop[age!]), then changing the subscripts to [country,age] would change the expression to SUM(Pop[country,age!]). Similarly if you have multiple equations with Subscript Constants these will be retained. If a variable has additional subscripts not in the list these will be removed.
Adding at end causes the selected subscripts to be added at the end of the existing subscripts for a variable. Thus existing subscripts will not be removed. If the variable already has one of the chosen subscripts it will be moved, if necessary so that it appears at the end. For example adding age to a variable subscripted [age,sex,country] will change the subscripts to [sex,country,age]. Just as for setting any existing occurrences of the subscript will be maintained in their current form. You can add one or more subscripts with this option.
Adding at beginning is the same as adding at end except the chosen subscripts appear first, instead of last.
Removing will remove the chosen subscripts from the selected variables. If the variables do not have any of the subscripts nothing will happen.
Include subranges in subscript lists, when checked, allows you to add subranges to variables. This can sometimes be handy if some variables will only be computed and used on a Subrange.
Replace subranges with the specified subscript allows you to override the default behavior for setting and adding subscripts. When this is checked if Vensim finds a subrange for one of the chosen subscripts it will replace it with the chosen subscript, rather than leaving it alone. Note that Vensim will still leave Subscript Elements alone. If you want to change these first remove them, then add the subscript range.
Add a new subscript to the model allows you to add subscripts. This can also be done from the Subscript Control or from the Equation Editor and this button is just a convenient alternative to those techniques.
Find
Find can be used to search for the occurrence of a model variable in a sketch view. When you use this command, the Variable Selection dialog will prompt you for the name of a variable. Choose a variable and click OK. The current view will be searched for the variable, and that variable will be highlighted and the sketch repositioned if necessary. If the current view does not contain the variable, the remaining views will be searched in a circular fashion. You will receive a message if the variable does not appear on any views, otherwise you will be positioned at the first variable found in one of the views.
NOTEAll of the Find commands will find both visible and hidden variables.
Find Workbench
Find Workbench is the same as Find except that instead of prompting you for a variable it uses the currently selected Workbench variable.
Find Again
Find Again repeats the search for the last Find command. Since the variables in a sketch do not have an obvious order, you can use Find and Find Again to find all appearances of a variable. The variable appearances are reported in the order stored internally by Vensim.