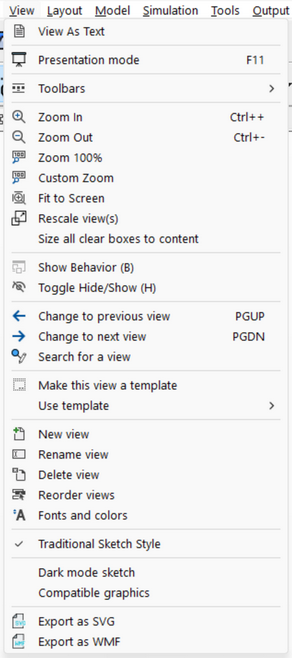
The View menu gives you control over the appearance of the sketch you are working with. Not all of the commands are available in Vensim PLE and PLE Plus.
As Text†
As Text causes the Text Editor to be open on the model you are working with. If you have made any changes you will be asked if you want to save them. If you don't save, the Text Editor will not be able to make a proper backup, and the Undo/Redo commands will be grayed in the Text Editor.
Zoom
Zoom lets you pick a percentage of full scale to zoom to. In addition to the percent values there are two special options.
Fit to Screen will cause the sketch to be zoomed until the entire view will fit in the current screen. The resulting zoom percentage will depend on the size of the current sketch. The zoom will never exceed 100% in Fit to Screen is selected.
Custom will query you for a percent to zoom to. You can enter any number between 10 and 500 percent.
When you zoom a sketch, the zooming will be remembered when leave and return to the view or close and later open the model. Zooming does not permanently change the sketch and the zooming percent is always relative to the normal sketch size.
Show Arrows
Show Arrows shows and hides arrows. When it is checked arrows are visible and will therefore be hidden by the command. When it is not checked arrows are invisible and will therefore be shown by the command.
Hiding the arrows removes clutter and can make rearranging somewhat simpler. Arrows that are explicitly marked as hidden will not be shown unless you have selected the command Show Hidden.
Show Behavior
Show Behavior, when checked, will display a graph of the behavior of each variable on the sketch. This is the same type of graph that is displayed when using SyntheSim. Displaying the graphs can be helpful in doing model analysis. The B key will also toggle this display setting.
Show Hidden
(Not PLE) Allows you to specify the hiding depth to which you want to see words. When you highlight this you will get a menu of depths include None to show no hidden elements, Depth 1 to show elements hidden to Depth 1 up to All (which is the same ad Depth 9) to show all hidden elements.
You can use the H key to toggle between All and None. You can use the Home key to decrease the hide depth and the End key to increase it. By repeatedly pressing the End key you can successively reveal more structure (pressing the Home key will successively hide more structure).
You can use the Magic Wand tool or the Edit>Hide to Depth command to change the depth to which different elements are hidden.
If you want to set up a sketch to do successive hiding start at depth 8, hide what you want, move to depth 7 hiding more, then depth 6 and so on.
Template View and Use Template
See Template Views.
Rescale
Rescale allows you to rescale the X and Y components axis of a view, or of all views in the model. This makes a permanent change in the width of the view. When you invoke the X Rescale command you will see the Rescale dialog.
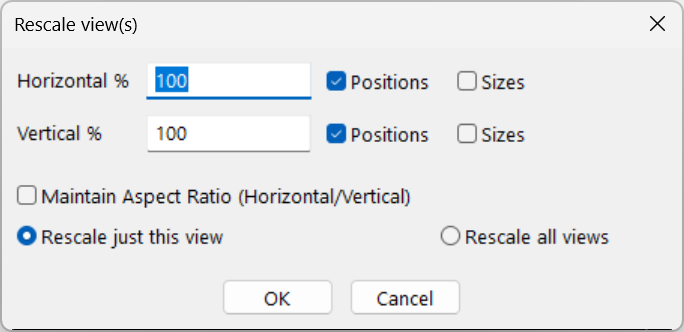
Percent is the amount to change the scale by. Bigger than 100% will make things bigger and further apart, less than 100% smaller and closer together.
Positions, if checked, will cause the positions of words and arrows to change.
Sizes, if checked, will causes the sizes of words to change.
Maintain Aspect Ratio, if checked, will force the vertical values to match horizontal.
Apply to, allows you to either select application to the current view, or all views in the model.
Rescale has no effect on font size.
The rescale command is useful for making small adjustments to the overall size of a view. It is also useful if you are moving a sketch to a computer with different display characteristics, though Vensim will probably prompt to see if you want to perform an automatic rescaling in this event.
New
New creates a new view, which will be added to the bottom of the list of views and will be given a new number corresponding to its position. If you have deleted or reordered views, the new number will be adjusted accordingly. The Sketch Editor will be positioned at the new and empty view.
Rename
Rename allows you to rename the current view. You can name your views anything you want, with a maximum length of 32 characters. The names of views are not used in the model itself, and will not conflict with Variable or Group names even if they are the same.
Reorder
Reorder allows you to reorder the Views in a model. This is done by clicking View->Reorder on the menu bar.
Delete
Delete deletes the current view (but not any variables from the model). You will be asked if you really want to delete the view. Deleting a view has no effect on the model or on other views, but once you delete a view you cannot recover it.
Font and Colors
Font and Colors lets you set the View Default font and colors.
| • | Background Color sets the views background color. Use the default color as shown to just use the standard Windows background color. |
| • | Shape Color sets the default colors for Boxes and other shapes. |
| • | Fill Color sets the default fill color. Use the default selection as shown for no fill color. |
| • | Arrow Color sets the default Arrow color. |
| • | Initial Arrow Color sets the color on Initial Arrows (arrow indicating a variable is used to initialize another variable so that the link is not part of the active feedback structure). |
| • | Font sets the default font. This font is used display all words that have not explicitly had a font attached to them. |
Changing the view's defaults makes it easy to make global changes to the appearance of a view and is more efficient than changing attributes on individual words and arrows.
Refresh
Refresh forces a redrawing of the sketch view screen. Under some circumstances, some video drivers will leave images on the screen that are not logically part of a sketch. The Refresh command will remove these. If screen clutter becomes a recurring problem there is an option for continually refreshing the screen.