
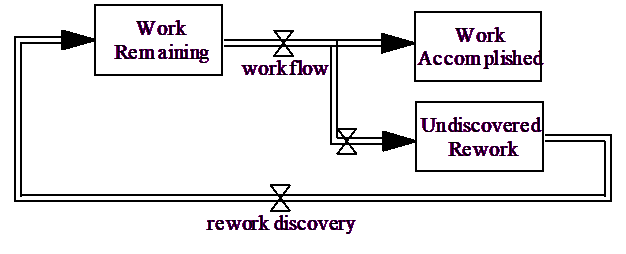
The Rate tool class contains the Rate tool and the Valve tool. The Rate tool adds a complete rate (a Valve, two Arrows and Clouds if necessary), while the Valve tool adds just the Valve. Rates and Valves are used to represent flows of materials into and out of Levels.
To use the Rate tool click on the variable you want to represent a flow out of, then move the mouse to the Level variable you want to represent a flow into and click again. A rate construct will appear as in:
By default the rate will have a single arrow and a editing box will appear so that you can name the Valve. You can press the Esc key to stop naming the valve. You can change this behavior from the Rate Tool Options dialog discussed below. Once you have created a rate you can add and remove arrowheads by clicking with the right mouse button (or Ctrl+Click) on the arrow's head or handle and checking or unchecking the Arrowhead checkbox. If you do not name a valve when the rate is first created, you can name it by clicking on the valve with a Variable tool.
When you add a new rate, the valve that is drawn will depend on the options you have set and whether the rate is drawn horizontally or vertically.
Once a valve is named it will always move with its name — dragging either the valve or the name attached to the valve will drag the other.
If you start a rate by clicking away from a word, a source (cloud) for that rate will automatically be created. Similarly if you end a rate by clicking away from a word a sink (cloud) will be created. If you want a rate starting at a source, click first on a blank portion of the sketch, then on the Level variable. If you want a rate finishing at a sink, click first on a Level variable, then on a blank portion of the sketch. For example, a rate from no variable to no variable will appear as:
There is no distinction drawn between sources and sinks (both appear as clouds), since rates can be both positive and negative. However, Vensim will keep track of the direction you draw rates when first setting up the active part of Level equations.
To draw a rate that makes bends, hold down the Shift key and click where you would like the rate to bend. By default the Valve will be placed in the middle of the rate, but you can force the valve to be placed in another location by holding down the Ctrl key and clicking where you want the valve to be placed.

Rate Options
There are a number of options you can set on rates that control the initial appearance of rates.
Type determines if the tool will create a complete Rate or just a Valve.
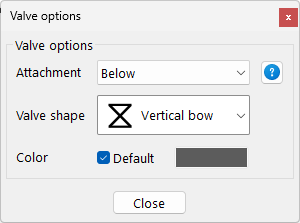
Initial Valve Type determines the initial appearance of the valve. If you select either the vertical bow type or vertical beam types the valve will be drawn horizontally when the rate itself is vertical. All the others will always be drawn as they appear.
Attachment lets you set how words will be attached to the valve. If this type is Below and you have selected the vertical bow or beam valve type the word will be attached to the right of the resulting horizontal valve.
Valve Color determines the initial color of the valve. If you select the default — color the default shape color for the view will be used.
Query Valve Name, if checked, causes the editing dialog to appear so that you can name each rate valve as they are created.
Line Style lets you set the initial style of the valve line as well as its color.
One Way Flow, if checked, will cause the rates you create to have only one arrow head showing the direction of flow.
You can also label the icon and set the background and foreground colors as with all tools.