The equation text fields appear in the upper portion of the dialog, following the Variable Information and Navigation panels. For many equations, only a single equation is needed.
Level variables and auxiliary variables with initialization equations contain a split text area. Examples are contained later in this section.
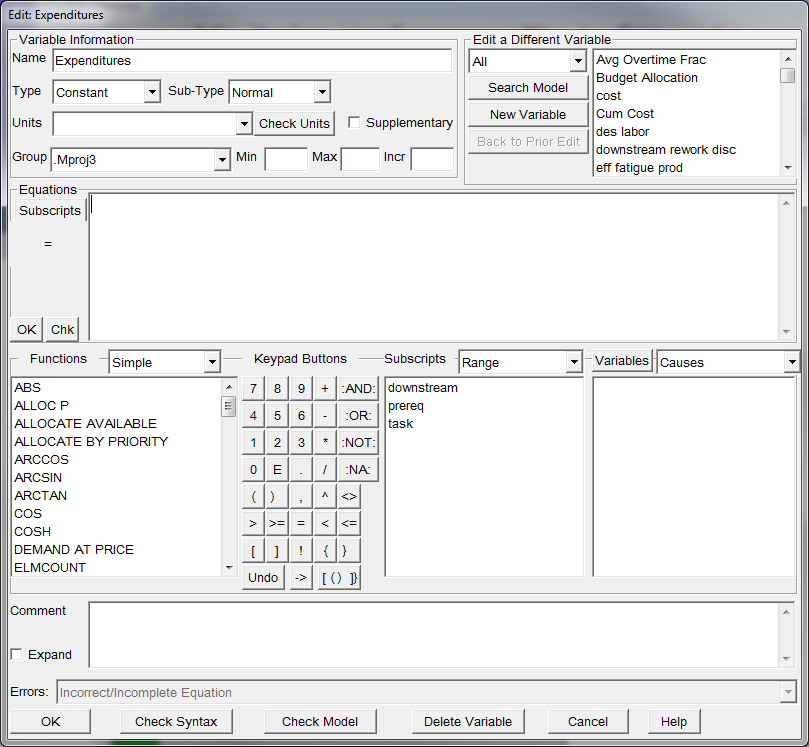
The variable name is the left hand side of the equation for variables that are not subscripted. Subscripts are explained in a following section. Data variables that are not computed do not require a text box for the right-hand-side.
To the left of the equation, the assignment operator and Vensim functions used to define a particular variable type are shown, such as = INTEG(. This part of the equation is placed automatically by Vensim and shown only as a reminder of the functional form of the equation. Vensim will automatically match any open parenthesis in this part of the equation and you will get a syntax error message if you try to add one yourself.
You can edit the contents of the Equation windows directly by typing. In addition, to make modification easier, variables, subscripts, operators, and functions that can be used in the equation are displayed in lists and buttons that appear below the equation text box.. These items can only be used to enter values into the Equation windows. If the cursor is in a different type of field, such as the units of measure, these entry mechanisms will not function
Positioning the Cursor
Clicking in one of the Equation windows places the cursor where you click, just as in other editing windows in Vensim. You can also move between windows using the Tab key and the Shift+Tab keys. Once inside a window you can move the cursor using the arrow keys or the mouse. You can select text in the windows by dragging over it with the mouse or holding down the shift key and moving over it with the arrow keys.
The first Equation window (variable name) will automatically scroll horizontally if you type a very long variable name. The remaining windows will automatically wrap text horizontally and scroll vertically. The active equation window always has a vertical scroll bar to allow you to position the text.
NOTE If you want to start a new line in an equation, hold down the Ctrl key and press the Enter key.
NOTE Pressing the Enter key in the Equation Editor will activate the default control button, which is normally the OK or Close button.
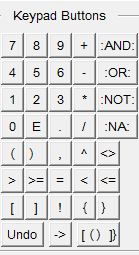
Keypad Buttons
The keypad allows you to enter numbers and most Vensim operations into the equation by simply clicking on the appropriate key. The indicated character is placed into the text buffer at the current cursor location.
 .
.
{[()]} :
The {[()]} button matches delimiters and has no keyboard equivalent. If the cursor is on a delimiter — a curly brace {}, bracket [] or parenthesis () — clicking on this button will move the cursor to the matching delimiter. This is useful if you want to check nested function calls or long expressions. If the cursor is not on a delimiter, nothing will happen. If you click twice on the Delimiter button you will be positioned back where you started.
Undo:
The Undo button undoes previous typing or variable additions in the window that has the focus. Undo only stores one level of change information. That is, you can Undo your last action or, if you have just clicked on the Undo button, Redo that action. Each Equation window keeps a separate Undo buffer. If you are typing information and not clicking on names or buttons, you can use Control-Z to get the same effect you get with the undo button.
Additional operators that are not contained in the keypad are available by clicking on the "More" tab to the right (not shown here).
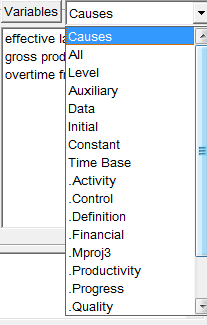
Variable List
The variable list contains a selected list of variables that may be added to an equation. The user may select which variables to see by clicking on the down arrow and making a selection. The usual list would be causes, which reflects the variables that are connected to the current variable on the diagram. Other choices include All, specific variable types, and members of particular groups.
The variables are listed in alphabetical order. The exception is for Level equations in which the first variable in the input list is always the variable for which an equation is being written.
If you are creating an equation and the Equation window contains the cursor, clicking on a name in the Variables list will enter that variable at the position of the cursor. If you select a variable has subscripts, the subscripts will also appear in the equation. Thus, clicking on the name task is done in the Variable list might put task is done[task] into the equation. The appropriate Subscripts for a given variable are determined from the equations (if any) for the variable and from other equations that use the variable.
The "Variables" caption is actually a button that will bring up the Variable Selection dialog. This allows you to do wildcard searches on variable name. You can select any variable from this dialog by clicking on the variable name and clicking OK. The Variable Selection dialog does not limit the choice of variables to expected inputs.
 (Not PLE or PLE Plus)
You can also use the Variable Type selector to see variables other than the expected inputs. Click on the down arrow to the right of Inputs. A list of the different selections will appear. Select All to display every variable in the model or another selection to display variables filtered by type. Just click on the selection you want. If you use this technique to review model variables be careful not to click in the list until you have chosen which variable to add. A single click in the variable list adds the variable to the equations.
If you do include new variables as inputs to an equation, or omit old inputs, you will be informed of this and asked if you want to update the input list. If you update the input list, the sketch information will be modified accordingly. If you do not update the input list, the equation you are working on will be marked as invalid even though it might contain no errors.
NOTE Subscripts and Functions do not appear in the Variable list since these can be accessed through the Subscript and Function lists.
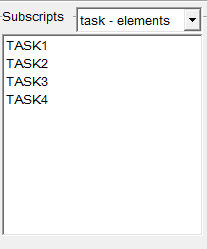
Subscript List
Subscripts are not available with PLE or PLE Plus.

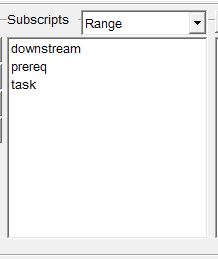
The list shows Subscript Ranges and Subscript Constants in the model. You can use these to replace the default subscripting supplied through the Variable list, specify new Subscripts for variables, or enter stand-alone Subscripts in an equation in the limited number of places they are allowed.
As with the Variable list, you can use the Subscript Type selector to see different things. Select Range to see all Subscript Ranges and Subranges. Click on a particular Subscript Range (such as Age) to see all of its elements. You can also click on *All Elements* to see all elements of all Subscript Ranges.
Functions:
Initially, Vensim displays the list of "Common" functions. The user can change that selection to find other functions.
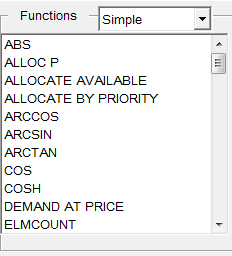
You can use the letters in the keyboard to move to different positions in the list. When you have found the function you want, simply click on that function to enter it into the equation. It will appear followed by parentheses ( and an argument descriptor list. The first argument descriptor in the list will be highlighted. You can double click on the arguments descriptors to highlight them and then replace them with the argument you want
(Not PLE or PLE Plus) If you have checked the No Arg List checkbox in the Sketch tab of the Global options dialog the instead of argument descriptors a series of commas , will be placed in the equation between parentheses ().
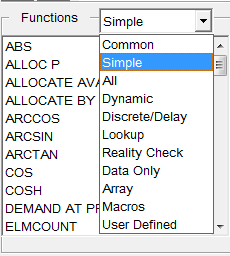
(Not PLE or PLE Plus) From the Show Class selector you can access up to nine types of functions: Common, Simple, Dynamic, Defining, Lookup, Reality Check, Macros, Data Only and User Defined. Click on the down arrow at the right of the selector to choose from the list.
| · | Common functions are the most commonly used functions. They are put into a relatively short list for convenience. |
| · | All is a comprehensive list of all functions and keywords. |
| · | Simple functions are built in functions that have no dynamics. They take 0 or more inputs and return an output that is independent of the values of the inputs at previous times. |
| · | Dynamic functions depend on their inputs and the value of their inputs at previous times. Dynamic functions are implemented as macros to allow you to look into the dynamics of the function. |
| - | Discrete/Delay are functions that support discrete event and entity modeling and include the DELAY… and QUEUE… functions. |
| - | Lookup functions lists those Lookups that have been defined for the current model. Lookups are defined as a series of x,y pairs, most commonly using the Graph Lookup Editor described later in this chapter. All Lookups take only one argument. |
| - | Reality Check functions are those associated with reality checks as described in Chapter 9 of the Modeling Guide. |
| - | Data Only are functions and keywords that are used only in data equations. These are separated out since their behavior is very different from that of other functions. See Chapter 2 for more discussion of data equations. |
| - | Array functions operate on Subscripted variables. |
| - | Macros are macros you have defined in the model. You must define these indirectly, as discussed in "Modifying Macros" later in this chapter. |
| - | User Defined functions are external functions that you have defined for use with Vensim. This menu Item is available only if you have specified an external function DLL. |
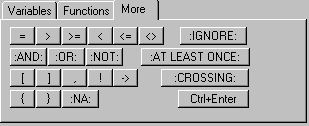
Additional Input Buttons
To access additional input buttons click on the More tab to the right of the number pad. This tab contains relational operators and logical keywords for use with IF THEN ELSE and SAMPLE IF TRUE. It also contains the characters contained in subscript equations (including the ! for the SUM, PROD, VMIN and VMAX functions).
The curly brackets {} can be used to comment out part of an equation.
:IGNORE: is intended to aid in using Vensim's partial simulation capabilities. If you have written an equation that does not use all the inputs, but wish to keep the existing input list, click on the :IGNORE: button and the excluded variables will be added after the :IGNORE: keyword. As you change the equation the :IGNORE: button will update the list of ignored variables for the equation.
:AT LEAST ONCE: and :CROSSING: are keywords that are used in Reality Check definitions.
Ctrl + Enter will place a hard carriage return inside of an equation. The default behavior of the Equation Editor is to simply wrap equation to fit in the editing window. You can break up lines by holding down the Ctrl key and pressing Enter.
As Graph Button
The As Graph button is located just below the Supplementary checkbox and is only visible when the equation type is Lookup or Auxiliary with Lookup. Clicking on this button will open up the Graph Lookup Editor, discussed later in this chapter.